
PowerShell Prompt的美化方案可选Oh-My-Posh和Starship, Starship速度比较快且功能够用了,所以下文一StarShip为例
-1. 一键安装脚本
irm "https://gist.githubusercontent.com/Huffer342-WSH/46b478a4bcc3bd00a6bec263961f8290/raw/powershell_optimize.ps1" | iex如果系统提示“禁止执行脚本”运行下面的指令:
Set-ExecutionPolicy -ExecutionPolicy RemoteSigned0. 精简版
- 安装
PSReadLine,posh-git,Starship以及自动补全插件
Install-Module PSReadLine -Force -SkipPublisherCheck
Install-Module posh-git -Scope CurrentUser -Force
# 安装智能预测插件
Install-Module -Name Az.Accounts -Force
Install-Module -Name Az.Tools.Predictor -Force
Install-Module -Name CompletionPredictor -Repository PSGallery -Force

winget install --id Starship.Starship
打开PowerShell配置文件
PowerShell# 打开配置文件 notepad $PROFILE在配置文件中输入一下内容
PowerShell[console]::OutputEncoding = [System.Text.Encoding]::UTF8 # posh-git Import-Module posh-git # PSReadLine Import-Module PSReadLine Set-PSReadLineOption -EditMode Emacs Set-PSReadLineKeyHandler -Chord Ctrl+v -Function Paste Set-PSReadLineOption -PredictionSource History Set-PSReadLineOption -Colors @{ Command = 'Cyan' Parameter = 'Yellow' String = 'Green' Operator = 'White' Number = 'Magenta' Comment = 'DarkGreen' ContinuationPrompt = 'DarkGray' } # Starship - 美化Prompt Invoke-Expression (&starship init powershell)安装Nerd字体并修改终端的字体
进这个网站下载一个Nerd字体并安装:https://www.nerdfonts.com/
然后再使用的终端中修改字体,比如VSCode是在
Settings中的terminal.integrated.fontFamily中修改
1. 修改PowerShell编码
中文的windows系统下的PowerShell默认编码是gbk,常常导致一些程序输出乱码(单片机用C语言是这样的)。windows里
下面的PowerShell指令检查当前的编码:
[console]::OutputEncoding如果不是 UTF-8,使用以下命令将输出编码设置为 UTF-8:
[console]::OutputEncoding = [System.Text.Encoding]::UTF8为了确保每次启动 PowerShell 时都将输出编码设置为 UTF-8,可以将设置写入 PowerShell 的 profile 文件。
AllUsersAllHosts:为所有用户和所有 PowerShell 会话加载(位于 PowerShell 安装目录下)。AllUsersCurrentHost:为所有用户但仅在当前 PowerShell 主机中加载。CurrentUserAllHosts:为当前用户但在所有 PowerShell 会话中加载。CurrentUserCurrentHost:为当前用户且仅在当前 PowerShell 主机中加载。通常是指$PROFILE,位于用户主目录下。可以通过以下命令查看它们的位置:
PowerShell$PROFILE | Format-List * -Force输出类似下面这样
PowerShellAllUsersAllHosts : C:\Windows\System32\WindowsPowerShell\v1.0\profile.ps1 AllUsersCurrentHost : C:\Windows\System32\WindowsPowerShell\v1.0\Microsoft. PowerShell_profile.ps1 CurrentUserAllHosts : E:\Users\Huffer\Documents\WindowsPowerShell\profile.ps1 CurrentUserCurrentHost : E:\Users\Huffer\Documents\WindowsPowerShell\Microsoft. PowerShell_profile.ps1 Length : 76
一般选 CurrentUserCurrentHost这一项的文件就行了,不过 conda init也会将指令添加到 CurrentUserAllHosts这个文件, 建议参考4. conda延迟加载。
在文件中添加以下内容:
[console]::OutputEncoding = [System.Text.Encoding]::UTF8保存文件后,PowerShell 每次启动时都会自动应用这个设置。
2. 优化 PowerShell 补全
2.1 安装并加载 PSReadLine 模块
PowerShell的路径补全是一个一个轮流显示的,而不是bash那样根据上文补全的。PSReadLine 模块可以让 PowerShell 的体验更像 Linux 命令行一样。
PSReadLine的Github仓库链接: https://github.com/PowerShell/PSReadLine
PowerShell的路径补全是一个一个轮流显示的,而不是bash那样根据上文补全的。PSReadLine 模块可以让 PowerShell 的体验更像 Linux 命令行一样。
PSReadLine的Github仓库链接: https://github.com/PowerShell/PSReadLine
安装
Install-Module PSReadLine -Force -SkipPublisherCheck配置
和上面一样,打开 $PROFILE 配置文件,添加一下内容
Import-Module PSReadLine
Set-PSReadLineOption -EditMode Emacs
2.2 安装 posh-git 提供Git指令支持
安装
Install-Module posh-git -Scope CurrentUser -Force配置
$PROFILE:
Import-Module posh-git2.3 安装 IntelliSense 智能补全插件
PSReadLine 2.1+ 支持插件式的预测器(Predictors),可以结合 Azure 插件和通用的补全插件,让补全提示不仅仅局限于历史记录,还能提供命令参数的智能建议。
安装插件
我们需要安装 Azure 相关模块(Az.Tools.Predictor)以及通用的补全预测器(CompletionPredictor):
# 安装依赖
Install-Module -Name Az.Accounts -Force
# 安装 Azure 预测插件
Install-Module -Name Az.Tools.Predictor -Force
# 安装通用补全插件
Install-Module -Name CompletionPredictor -Repository PSGallery -Force
配置
打开 $PROFILE 配置文件,在 Import-Module PSReadLine 之后添加以下内容:
# 加载预测插件
Import-Module Az.Tools.Predictor
Import-Module CompletionPredictor

# 设置预测源:同时使用历史记录和插件提供的建议
Set-PSReadLineOption -PredictionSource HistoryAndPluginPSReadLine的补全提示有两种方式,按F2切换:
- (默认)行内内联显示,
→补全 - 列表显示,按
↑↓选择,Tab补全
在$PROFILE中添加以下内容将列表显示设置为默认:
Set-PSReadLineOption -PredictionViewStyle ListView3. 安装Starship美化PowerShell
安装
winget install --id Starship.Starship启用StarShip 以下下内容添加到 $PROFILE
Invoke-Expression (&Starship init PowerShell)设置主题
配置文件在 %USERPROFILE%\.config\Starship.toml
3.2 安装 Nerd 字体
官网教程: https://ohmyposh.dev/docs/installation/fonts
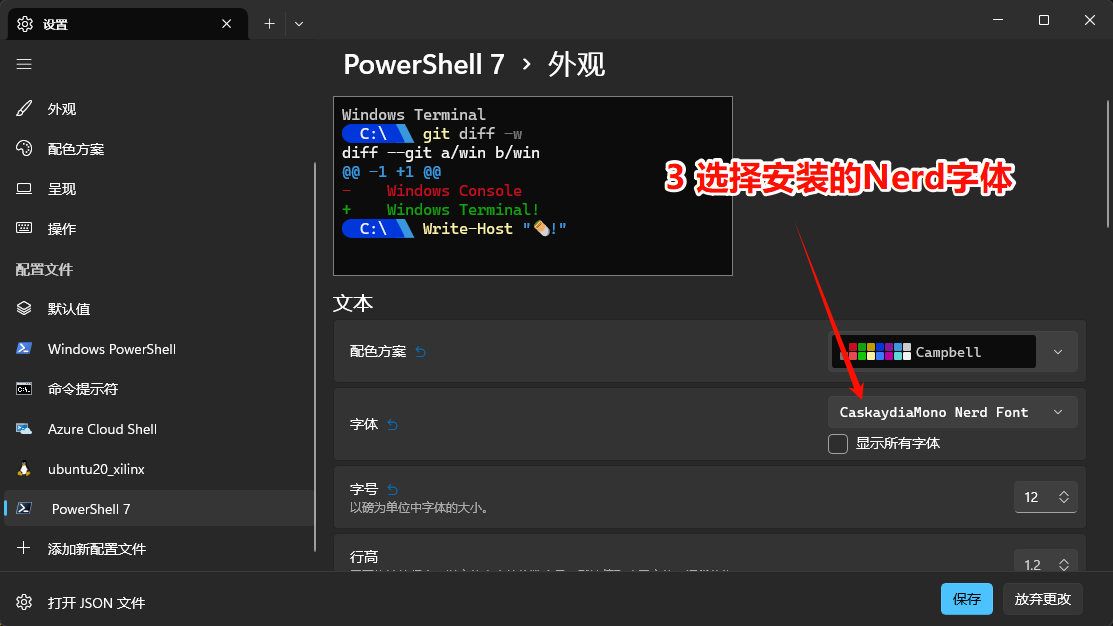
安装显示图标需要的Nerd字体,否则就会像下图这样,不能正常显示。我使用的是CaskaydiaMonoNerdFontMono-Regular.ttf

安装完成过后需要设置终端使用的字体,Windows Terminal的修改方式如下

VSCode的话再设置里搜索terminal.integrated.fontFamily
填上安装的字体就可以
4. conda延迟加载
windows下conda初始化速度很慢,推荐直接安装miniforge并使用里面的mamba 使用
mamba shell init --shell powershell向powershell初始化脚本添加内容
conda init会添加初始化指令到 ~\Documents\PowerShell\profile.ps1,封装里面的初始化指令
# 单次加载conda
function Invoke-CondaInit {
    if (-not $script:CondaAlreadyInitialized) {
        Write-Host "Initializing Conda..." -ForegroundColor Yellow
        If (Test-Path "C:\SDK\Miniconda3\Scripts\conda.exe") {
            (& "C:\SDK\Miniconda3\Scripts\conda.exe" "shell.PowerShell" "hook") | Out-String | ?{$_} | Invoke-Expression
        }
        $script:CondaAlreadyInitialized = $true
    }
}

# conda 指令替换
Set-Alias -Name conda -Value conda-wrapper
function conda-wrapper {
    Invoke-CondaInit
    conda @args
}